Friday 28 September 2012

Aunt Martha's Vintage Transfers available at Crafty Frog

Aunt Martha Hot Iron Transfer Pattern

Aunt Martha Logo


Dottie the Duck

Iron On Transfers
by Aunt Martha's

Price: $3.50

Item:
3400AM

  • Use for embroidery, fabric painting, wearable art, needlepoint and other crafts.
  • These designs would make really cute dish towels, aprons, fancy napkins, table runners, pillow cases, quilts,  table cloth, hot pads, pot holders, decorative clothing, &/or decorative art.
  • Each design is good for several stampings!!

There are instructions on how to transfer the design and color suggestions. 
For over 70 years Aunt Martha's has been making hot iron transfer designs.
These antique reproduction designs can be used for embroidery, fabric painting, needlepoint, wearable art and other crafts. Each transfer is good for several stampings.
Aunt Martha's hot iron transfer patterns are printed on a giant 18" x 24" sheet of 32# newsprint paper. Each pattern is printed with a black transfer ink.
Local Pickup is Free, from:
Crafty Frog
Shop 4, 107 Marconi Cres, Kambah, ACT
Phone: 02 6296 6240 

For multiple item purchases please request 'TOTAL FROM SELLER' before paying at checkout.
We will combine & reduce the postage cost for you saving you money on your postage.
If you do over pay via PayPal, then we will refund back to your Paypal Account when we process your order.

If you can't find what you are looking for, please just message us and we will try to help!

Thursday 27 September 2012

Wednesday 26 September 2012

"9 Free Knitting Patterns Perfect for Spring" eBook - FREE

AllFreeKnitting have a free eBook for you to download
"9 Free Knitting Patterns Perfect for Spring".

 I think you have to join the site, which is free, but OMG they have some beautiful designs.  Of course if you need any knitting supplies, we have it all here at Crafty Frog at a reasonable price for you.  Just contact us and we will be only to glad to help you.

Cheers


Surprisingly Stretchy Bind Off - Video

Surprisingly Stretchy Bind Off

By: Rebecca Roush for AllFreeKnitting

Sometimes when you bind off using traditional methods, the final edge can be too tight.    This can cause serious fit problems in the cuff of socks, or make it difficult to block out points on a shawl.  In this free knitting tutorial, we'll learn how to knit a Surprisingly Stretchy Bind Off to avoid this problem.  By introducing reverse YO's (yarn overs) into the bind off, the edge becomes a lot stretchier, but still looks very much like your traditional bind off.

Read more at AllFreeKnitting


Patons Big Baby 4ply & 2 Free Baby Patterns

If there is a new arrival in your family, or one due ... then this yarn is exquisite, plus there are 2 free baby patterns you can download. 

Cheers


Patons Big Baby 4ply 100g

Composition:  60% acrylic, 40% nylon
Size: 100g ball
Length: 420m
Recommended needle size: 3.25mm
Tension: (10x10cm) 28 stitches x 36 rows
Washing instructions: Gentle Machine Washable.
Made in: Australia
Listing & Price is per ball

Colours available (pls specify COLOUR NUMBER when ordering)
Colour Chart

OUT OF STOCK

White
2540


OUT OF STOCK

Light Blue
2541


OUT OF STOCK

Light Pink
2542


6 Balls

Pink
2546

OUT OF STOCK

Mauve
2547

10 Balls

Sky
2554


10 Balls

Sea
2556

10 Balls

Lupin
2557

OUT OF STOCK

Navy
2558


9 Balls

Poppy
2559

8 Balls

Banana
2561

OUT OF STOCK

Cameo
2562


OUT OF STOCK

Stone
2563

OUT OF STOCK

Cream
2656

8 Balls

Sweet Pea
3909


9 Balls

Azure
3910

8 Balls

Dew Drop
3911

8 Balls

Sky Pink Print
3916


OUT OF STOCK

Sky Green Print
3917

4 Balls

Lemon
9927


FREE PATTERN SUPPORT
Click on Download Button (opens in separate window)

Patons Free Pattern
Cross Over Cardigan


FREE

Patons Free Pattern
Baby’s Aran Jacket


FREE


If you are looking for a 4 ply baby yarn which has is good quality and value for money a 100g ball of Patons Big Baby 4 ply yarn would be an excellent choice, suitable for all your knitting, crochet or craft projects.

Gentle Machine Washable.

Local Pickup is Free, from:
Crafty Frog
Shop 4, 107 Marconi Cres, Kambah, ACT
Phone: 02 6296 6240

Wool is posted in Australia Post Satchels
a 500 gram Satchel costs $7.20 (5 x 100 gram balls)
a 3 kg Satchel costs $12.50 (about 15 x 100 gram balls will fit)


For multiple item purchases please request 'TOTAL FROM SELLER' before paying at checkout.
We will combine & reduce the postage cost for you saving you money on your postage.
If you do pay the balance immediately via PayPal, then we will refund the difference back to your Paypal Account when we process your order

If you can't find what you are looking for, please just message us and we will try to help!

PLEASE NOTE: These colours are indicative only and may not exactly reflect their true colour due to differences in screen calibration.

Monday 17 September 2012

The "Magic Loop" technique & Free Patterns


The "Magic Loop" technique is a way to knit socks or small circumferences using one circular needle. The length of the circular needle you use should be about 3-4 times the circumference of your knitting. So for example, if you were to make a pair of socks.,  use a circular that is at least 29 inches (approx 74 cms) long.


Magic Loop knitting is a handy alternative method for those who tire of losing their double pointed needles. Another alternative method that is popular for knitting small items in the round is using two circular needles.

If you are interested in exploring “Magic Loop” further there is an instructional video below.


We have found a couple of patterns using the “Magic Loop” Technique. There is one for an iPhone cosy and one for socks.  The links are listed below where you can download these free patterns.  Remember that much of our yarn is on sale this week (17 - 21 September).  Please note that the beautiful new Poems sock yarn is not on sale.


iPhone cosy

Pattern has been copied at the end of this Blog

Basic Toe-Up Sock Using the “Magic Loop” Circular Method

Pattern has been copied at the end of this Blog
  

----------------------------------------------------------------------------------------------------------

iPhone cosy


If, like me, you’ve just fallen in love with your new iPhone 3G S, you’ll want to protect it. What better way than a waffle-stitch cosy?
Your iPhone deserves the best, so choose something with a lot of bounce to show-off the stitch pattern. Some left over, hand-painted, superwash merino sock yarn is ideal.
Instructions are given for double pointed needles, but it easily be knit on circular needles using the magic loop technique. The bottom of the cost is joined using the three-needle cast-off (that’s ‘bind-off’ to US English speakers). This technique is a bit fiddly but easy to master, a sewn seam could alternatively be used.

Size information

The finished cosy measures 13.5 x 6 cm (5 1/4 x 2 1/4 in.) unstretched, and will stretch to fit an iPhone or other device measuring approx. 11.5 x 6 x 1 cm (4 1/2 x 2 1/5 x 1/2 in.).

Requirements

Yarn & notions

  • 55 m (60 yards) heavy 4 ply superwash merino such as Colinette Jitterbug (pictured) or Debbie Bliss Rialto 4 ply

Needles & equipment

  • 4 x 2 mm double pointed needles
  • 4 x 2.75 mm double pointed needles
If using circular needles, you will need a spare 2.75 mm needle for the three-needle cast-off.

Tension/gauge

38 sts and 48 rows over 10 cm (4 in.) square in unstretched waffle pattern

Instructions

iPhone Cosy

Ribbed edging

Using smaller needles, CO 42 sts
Distribute sts across three needles. Join to work in the round, taking care not to twist work.
Next row (rib): [K1, p1] to end
Work 5 rows more in 1 x 1 rib

Body

Switch to larger needles
Waffle pattern
Row 1: Purl
Rows 2-4: [P1, k2] to end
Continue in waffle pattern until work measures 13 cm (5 in.), ending with row 3 of pattern
Next row (decrease): [K2tog, k1] to end (28 sts)
Turn work inside out, distribute sts evenly on 2 needles, 14 sts on each
Work three needle cast-off
Weave in ends and turn right-side out


______________________________________________________________________

Knitting A Basic Toe-Up Sock Using the “Magic Loop” Circular MethodOne Sock on One Circular
This pattern includes instructions for knitting ONE sock at a time from the toe up using a 40” circular needle.

 Materials:

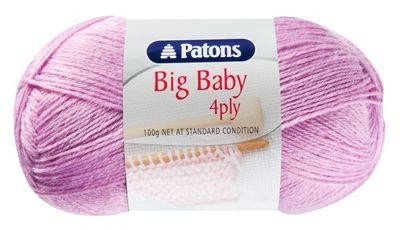
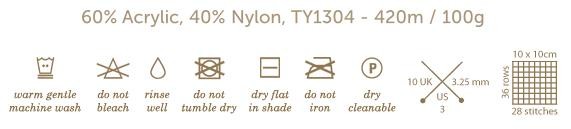
 100 Grams of Sock weight or Fingering weight yarn.
 US size 1 or 2 40” circular knitting needle – or size needed to work with your weight of yarn for a gauge of approximately 7 or 8 stitches per inch.  With this method, you can try the sock on as you go to make sure you get it the correct size.

Special Stitches: 

M1L: Make 1 and Make 1 left – insert left needle, from FRONT to BACK, under the horizontal strand between last stitch worked and next stitch on the left needle, forming a loop on the needle.  Knit through the BACK of this loop.  (I like to use my right needle to lift the strand onto the left needle.)
M1R:  Make 1 Right – Insert left needle, from back to front, under the horizontal strand between last stitch worked and next stitch on left needle, forming a loop on needle.  Knit through the front of this loop.  TIP:  It is often difficult to get your needle into the loop, so I like to lift the stitch up with my right needle to loosen it and then hold the slack against the left needle with my finger while I insert the right needle.
SSK:  Slip, Slip, Knit – Slip 2 stitches, one at a time, as if to knit.  Slide left needle through the front loops of these slipped stitches, from left to right, and knit them together from this position.
KB:  Knit through the back loop of the stitch.
YF:  Yarn forward – move the yarn between the needles to the front.
YB:  Yarn back – move the yarn between the needles to the back.

Instructions:

Using the figure 8 cast on method, loosely cast on 12 stitches (this means to begin with 12 stitches on the top needle and 11 on the bottom needle which will become 12 on both needles after you complete the first two rows. 

Toe and Toe Increases:

Round 2:  K1, M1L, Knit to 1 stitch before end of needle, M1R, K1,* change needles and repeat between asterisks to complete the round. 
Round 3:  Knit, changing needles at the halfway point.  From now on, it will be assumed that you return to home position (with all stitches up on the needle points) at each needle change and then pull out the back needle (the one with the yarn attached) to being knitting off the front needle.
Repeat Rounds 2 and 3 until you have a total of 56 stitches (for small to medium woman’s size) or 60 or 64 stitches (for medium to large woman’s size) or until you try on the toe and it fits your foot or the circumference measurement is correct for the foot for which the sock is being made.
This is the time to snug up the loose cast on stitches.  First, tie a bit of yarn or attach a pin to mark the end which is the beginning of the row – the side OPPOSITE of the yarn tail.  To do this, slide the work onto the cables with the yarn tail to your left.  Find the first loose stitch on the right.  Using a blunt tapestry needle, work across the cast on stitches form right to left, gently pulling the extra yarn out of each stitch until you read the last stitch, then pull on the tail to remove the excess yarn.

Foot:

Knit all rounds until sock measures 3” less than length of foot. 
Increase Round:  K1, M1L, Knit to 1 stitch before end of first needle, M1R, K1.  Change needles and knit all stitches on second needle.  Increase is made on first needle ONLY - which will become the heel side of the sock.
Continue knitting for 1 more inch, or until sock measures 2” less than length of foot.
Repeat the increase round.  You will have 4 more stitches on the first or heel needle than on the second or instep needle.

Shaping the Heel:

Heel is worked on one needle, turning at the end of each row just as if you were working on 2 straight needles.  Instep stitches remain on the other side of the cable until heel is complete. Important:  After each wrapped stitch, pull the needles apart gently to keep the yarn loose around the slipped stitches, then work the first stitch of the next row carefully to prevent tightening what you have loosened.  This will help prevent holes along the edge of the heel.
All slipped stitches should be slipped PURLWISE.
Row 1.  Knit until you have 4 stitches remaining on the first (heel) needle.  Slip the next 2 stitches purlwise, yf, turn.
Row 2.  Slip 1, yf, purl until you have 4 stitches remaining on the needle, slip 2, yb, turn.  COUNTthe number of stitches you purled on this row and make a note of that number.  You can write a chart similar to the one below to help you keep track of your stitch count.  This is VERY important in order to keep your heel centered.
Row 3.  Slip 1, yb, knit 1 stitch less than you purled on the previous row, slip 2, yf, turn.
Row 4.  Slip 1, yf, purl 1 stitch less than you knitted on the previous rose, slip 2, yb, turn.
Repeat Rows 3 and 4 until you have approximately 12 or 13 stitches purled between the slipped stitches.  Now the wrapping procedure is worked in the other direction.
Next Row:  Slip 1, yb, knit 1 MORE stitch than you purled on the previous row, slip 2, yf, turn.

NOTE:  You may begin a slip one -  knit one stitch here on the knitted rows only to reinforce the heel.  If you do this and find you would end with a slipped stitch before the regularly 2 slipped stitches, knit 2 in a row rather than slip 3 stitches.  You may continue this on the instep side of the sock until you being the leg.

Next Row:  Slip 1, yf, purl 1 MORE stitch than you knitted on the previous row, slip 2 yb, turn.
Continue repeating these last 2 rows until you have only 2 stitches remaining after slipping the 2 stitches after purling across the row.
Work now continues in the round.

Sample counting chart for heel – check off each row as you knit.  If you cast on more stitches to begin with, just add the extra rows at the top and bottom of the chart:
If you cast on 32 stitches for each half of the sock and increased on the heel side to 36 stitches, you will be working with 36 stitches for the heel.  So on the first row of the heel, you will knit 32 stitches, slip 2 stitches, bring the yarn forward, and turn your work with 2 stitches still remaining on the one needle.  Then you will purl back to the last 4 stitches, which would be 29 stitches.  Slip 2 stitches, move the yarn to the back, and turn.  The count for each subsequent row would be:

This should bring you back where work continues in the round.


Round 1.  Slip 1, yb, knit across to the last heel stitch, pick up the last wrap with the point of the left needle.  Knit this wrap and the last stitch together.  Do not turn.  Slide stitches back to home position, pull out the back needle and knit across the instep stitches.
Round 2.  At the beginning of the heel needle, slip the first stitch knitwise, pick up the wrap which is around the next stitch and place it on the tip of the right needle.  Slide the tip of the left needle into the front loops of the wrap and the slipped stitch and knit them together from this position.
Knit across remaining heel stitches, change needles and knit across the instep stitches.
Decrease round: K1, ssk, knit until you have 3 stitches remaining on the needle, knit 2 together, k1, change needles and knit all instep stitches.
Knit one round even.
Repeat the decrease rounds until you have the same number of stitches on the heel needle as you have on the instep needle.
Knit another round even before beginning leg.  If you were knitting a reinforced heel stitch, do NOT continue it with this row.
Leg:
The leg of your sock can be knitted in plain stockinette stitch, in any type of ribbing, or in any other pattern you choose to use.  The leg can also be knit to any length you like.
Cuff:
 If you didn’t use ribbing on the leg, you may want to knit 1 or more inches of ribbing for the cuff of the sock.  You could also knit a picot edge or just continue with stockinette if you like a rolled top.  Anything goes!  AND no grafting of toes necessary!
You may want to use a stretchier than usual cast off for the top if you ended with a ribbing.  
Here are some choices for toe-up cast offs:

Pattern available from 

Wednesday 5 September 2012

Easy Shawl

Spring is one of my favourite seasons, as it tends to always keep me pepped up as well. This is the time when you can hear birds chirping softly as new buds cover the greens. For all the lovers of this season, here is a beautiful, easy to k
nit shawl, as sometimes there is still a bit of a chill in the air. This would be delightful in Katia Darling ... which of course, we stock. Pop in and see Jo and discuss how easy this is to knit up.

Katia Darling is 60% Merino Superwash & 40% Nylon. A colour card and more information about Katia Darling can be found on Katia's website http://www.katia.com/lana.php?idLana=darling